‘Tis the season for Christmas cookies as well, so I thought I should share with you my version of the candy cane cookie. You can’t go wrong with cookies shaped into candy canes with a hint of peppermint to share with family and friends. Since my mom bakes her traditional Greek cookies every Christmas, I figured I would try and make something different instead each year. Lately I’m more interested in baking sugar cookies and decorating them with icing. Actually, it’s one of my personal goals to become better at decorating them. However sometimes I like to try new recipes and as always put my spin on it. Once my cookies have cooled off they are ready to be shared with everyone, from our next door neighbor to a dinner party hosted here at home. When I do give them away, I like to present them in a Christmas themed tin container or on a platter wrapped in cellophane and some ribbon. Truthfully I haven’t started my baking yet, but I’m planning on getting started next week. I’m actually going to try something new, so perhaps there will be a blog on that. To begin gather all your ingredients and prepare your work area. This recipe should provide you with two dozen candy cane cookies.
Cookie Ingredients:
- 1 cup unsalted butter, room temperature
- 1 cup powdered sugar
- 1 egg
- 1 teaspoon vanilla extract
- 1 teaspoon peppermint extract
- 3 cups all-purpose flour
- red food colouring
Cookie Instructions:
- Beat at medium speed the butter and sugar in your stand mixer or with a hand held mixer. Then add to your bowl the egg, vanilla and peppermint extract. Make sure all the ingredients have combined well and lastly add the flour in slowly. Again make sure the dough has no visible flour bits by mixing it thoroughly.
- Now divide your dough in two halves, place one section aside and the other back in your bowl. Add red food colouring and mix. Add as much or as little as you want of the food colouring to get your desired red.
- Take the two halves and flatten them out about 1″ thick and wrap them up with plastic wrap. Place them in your fridge for 1 hour. This will help you later when it’s time to roll and shape the cookies into candy canes.
- Preheat your oven to 375 F and get your baking pans ready with parchment paper.
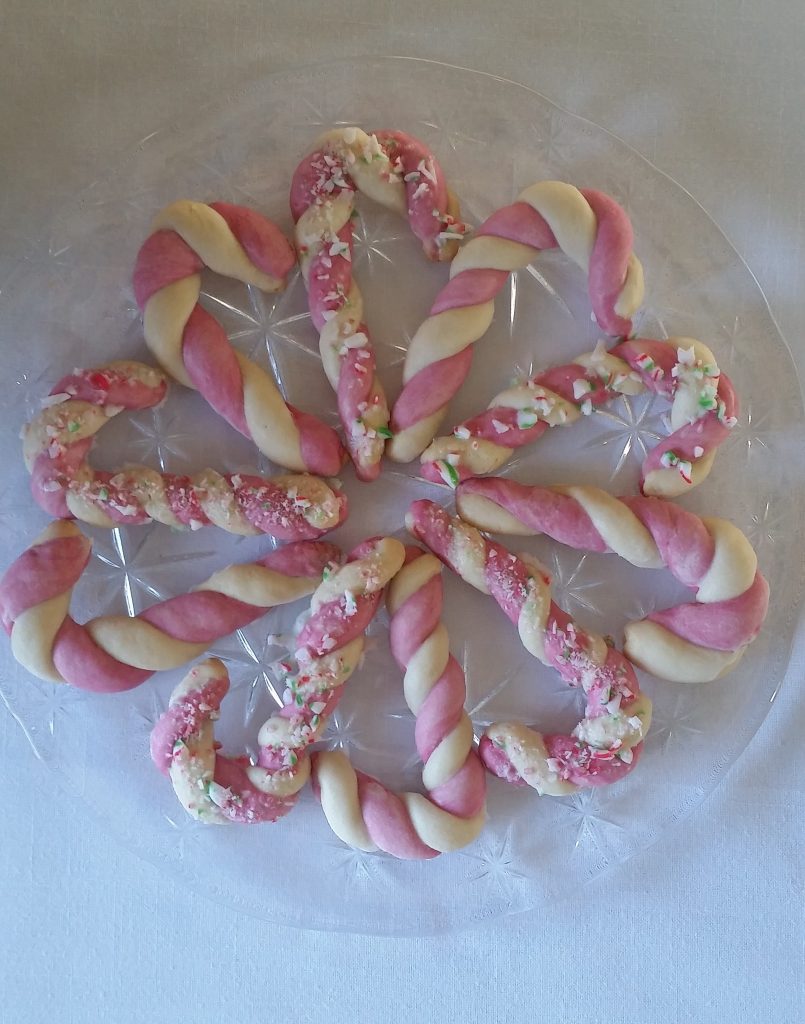
- Take out the dough from the fridge and remove the wrap. Take a tablespoon and scoop out two spoonfuls of dough from each section. Then roll the red scoops out about 5″- 6″ long and proceed by doing so the same with the plain dough. Take both pieces and pinch them together at the top then twist them together like a rope and shape into a candy cane. Place your cookie on the parchment paper and continue to do the same with the remaining dough.
- Once done place the cookies in the fridge for 15 minutes, so that they will hold their shape while baking.
- Pull them out and place them in the oven for about 10 – 12 minutes or until you see the edges slightly darken. Make sure not to let them get golden brown or the red and plain dough won’t look as vibrant. Place them on a cooling rack until they have completely cooled off.
Now for the candy shine finish. You will need to brush each cookie with a glaze, if you want to go the extra mile add some crushed candy canes on top before the glaze hardens. You don’t have to do this to every cookie, in fact your better off having on option without the glaze or crushed candy. However if you choose to, it will upgrade the cookie’s appearance, texture and taste. I personally used the large candy canes, in which I had on hand from a Christmas party with the traditional red and green ribbon throughout. I also did add the glaze to all my cookies but only added the crushed candy to some.

Glaze Ingredients:
- 1 cup powdered sugar
- 1 – 2 tablespoons 2% or 3% milk
- 2 – 3 large candy canes
Glaze Instructions:
- Mix sugar and milk in a small bowl until completely combined, make sure that it’s not too runny. If it is, add more sugar or if it’s too thick add more milk.
- In a sandwich bag place your unwrapped candy canes and make sure there isn’t any air and fasten. Take a mallet or something solid and crush the candies until you see tiny bits.
- Take a food brush and dip it into the icing and coat the entire cookie top. Then sprinkle some of your crushed candy cane before the glaze sets.
Your end result should look something like mine, perfect for Christmas and even better hanging off a mug of hot chocolate. Now as you can see, I decided to hold back on the red food colouring but again that’s all up to you. You could also add green food colouring to the plain dough. If you want to go even further try twisting three ropes together so that you have a red, green and “white” candy cane cookie. Also my cookies are on the larger side so if you want, use less dough and shape out smaller candy canes. Whether you want to use the crushed candy cane or not, again up to you. You could also garnish with some red, green and white sprinkles instead.
Happy baking everyone!!!